Vacuum Casting Handmade Paper
by Catherine Nash
I wrote this as an independent study while a graduate student at the University of Arizona over 20 years ago. In 1987, there were no home computers, no internet, very few published books and very little networking among paper artists as yet. The name of the game was experimentation. I maintain that it still should be, even with all our resources available to us today.
This report is the result of 4 months of testing and experimenting with a paper-making vacuum system designed by Chuck Hilger of Santa Cruz, CA. The system was purchased by artist Barbara Kennedy1 of Tucson, Arizona, with whom I worked in her studio as an apprentice from December 1986 through March 1987. I assisted her in exploring potential effects and uses of the vacuum system. I was able to create a number of my own works using the vacuum casting technique during this time as well.
The following is a record of our experiments:
December 12, 1986
|
Vacuum Chamber
|
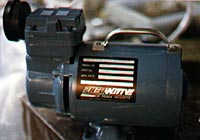 |
Pump/Motor |
The vacuum system, ordered through Hilger Productions had arrived. We unpacked the 2 large boxes and listened to the included instruction cassette. Here is a synopsis of the notes from Chuck Hilgers tape:
This vacuum system is composed of 3 basic components:
1) Table Large sheet of pressed board coated and sealed with 3 coats of marine resin. (I will note here that Barbara did not order his table, instead we used a large sheet of formica.)
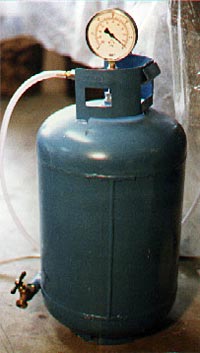
2) Vacuum Chamber 6 1/2 to 7 gallon tank capacity. Attach pressure gauge to the top. A 6 foot hose from the vacuum table attaches to coupling at the bottom of the tank opposite from the faucet. Important: Drain the tank after each use: this way you can keep track of the amount of water in the tank and it slows rusting process down. Do not overflow the tank. It will ruin the system!
3) Vacuum Motor A piston motor made of aluminum (no corrosion) with a maximum pressure of 27.5 Hg (mercury). (Note a vacuum pump is the opposite of a compressor.) Muffler is attached to the motor adjacent to the hose coupling. Needs no oil or lubrication. The hose from the motor is attached to the tank in front of the gauge. There is no required proximity between the tank and the motor pump. The length of the hose between them is variable: you may wish to have the pump in another room for safetys sake.
Important: You dont want to keep motor on the floor - away from wetness and potential contact with water. Get it away and separate. Clamp it down. Do not store tank in a higher position than the table. Otherwise once pump is turned off water will flow right back out the hose onto piece! Dont worry about any rust that appears on tank. It will take ten years to ever wear through.
 |
 |
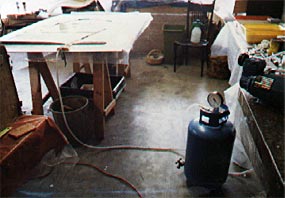
Entire Vacuum system in Barbara Kennedy’s studio. |
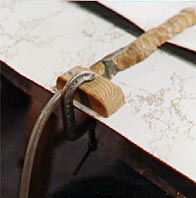
Clamp Hose to Table. Plasticene clay helps create a better seal. |
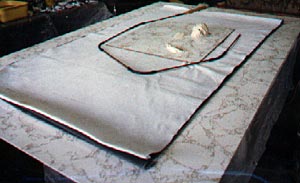 |
Table top system set up. |
4) Copper Tubing Attached to the hose on the table, it is a number of lengths of tubing connected by black rubber
hose making it flexible. Each length has several holes evenly spaced apart, the last ones end is sealed.
The water is sucked through these holes into the hose.
5) Grey Fiberglass Screening Two layers that must be smaller than the actual table by at least 4 to 5 inches on every
side to allow for the overlapping plastic. (i.e. plasticized window screening)
6) Synthetic Felt Crease proof Ultra Felt. Regular cloth does not work because it will shrink and curl. We had
some success with Pelon .) Two layers that are equal in size to the screening.
Anything less than 4 layers (2 screening and 2 felt) will be unsuccessful. Its purpose is to allow air space for water to be transported. Less layers will force plastic down more tightly and inhibit the flow of water. The first layer of felt is never removed. The 2nd is cut to the size of the piece you are creating and is for transport. (We actually place our piece on a small board of sealed formica which is then placed on top of the felts. We felt that the transport of the art work after vacuuming was damaged by bending. The board eliminates this.)
7) Foam Rubber Large sheets of varying sizes 2 to 3 inches thick. The foam rubber is placed over the pulp that is
to be cast and completely covers the copper tubing. (With using any sharp plaster moulds or other object, we
found that an extra layer of foam rubber prevented the plastic -under vacuum pressure- from piercing through.
The extra layer did not hinder the water flow.)
8) Plastic Sheeting A six foot wide sheet of industrial strength pallet wrap. Order PVC Pallet Wrap from Dow Chemical
or Borden Chemical in Monsanto, CA. One can also use 2 layers of plastic drop cloths. (Ordering pallet wrap
proved to be the most frustrating situation - it took several months to locate a source that was reasonably priced.
Barbara finally did succeed though.) The entire sheet should be of a size that allows for at least 4 inches overlapping
the felt and screening on all sides.
Test for Air Leakage
Assemble system as described earlier.
- Put one inch square of gray duct tape over each hole on the copper tubing.
- Make sure drain valve is off.
- Connect motor and tank together.
- Plug motor in.
Watch pressure gauge - it should get up to -25 or -26Hg (level of mercury). Check for leaks to make sure the vacuum system is operating properly. Take tape off holes.
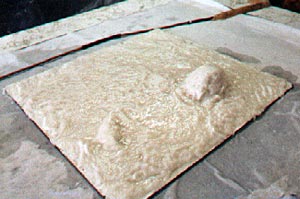 |
Note how wet the pulp is left, to insure better fiber bonding. |
|
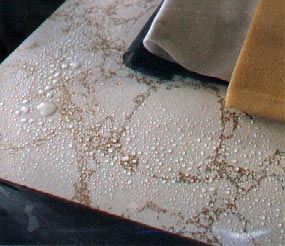
Atomized perimeter just before covering with plastic
and vacuuming |
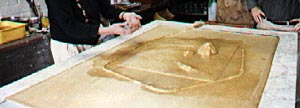 |
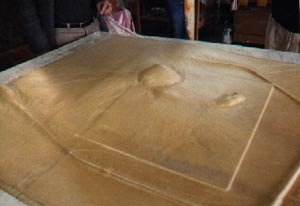
Vacuum system at -22.5 Hg with air sucked out of foam
and water pulled into the copper tubing, through the hose and into the tank.. |
|
Releasing the pressure |
|
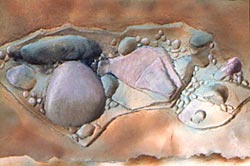
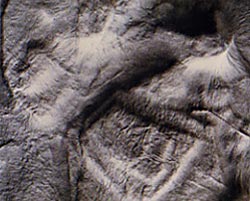
Final image after vacuuming. |
Method
- Make sure that the 2 layers of cloth and two of screening are stacked perfectly uniformly together. There should be a 3-4 inch
perimeter of clean table around cloth to create a seal. Nothing should be hanging out.
- Put pulp onto piece that is to be cast.
- Directly over that, place your foam rubber sheet.
- Atomize the perimeter with a spray or wet sponge.
- Cover the whole system with the plastic pallet wrap. No wrinkles in the plastic so that air cant leak.
- Turn on the system.
- As the vacuum begins, smooth wrinkles out of plastic. Check for any possible air leakage. (The tubing where it enters the plastic
is a potential problem area. We helped resolve it by covering it with plasticene clay.)
If pressure doesnt work it could be 1 of 3 things:
1) Drain Valve is open.
2) Cloth not completely covered. Plastic needs contact to base table.
3) Plastic has a hole.
- The pressure should reach up to -20 or 23Hg at least. Leave the system on until no more water can be seen through the translucent
hose traveling into the tank.
- Turn off motor and release the pressure by pulling off plastic. Carefully remove foam off of piece.
RECORD OF EXPERIMENTS
December 19, 1986
Barbara and I set up the equipment as directed and tested the system for air leakage. with all the holes taped over and the motor on, the pressure never increased more than -5.0Hg. It should have reached a level of -25 to -26 Hg. Checked tubing, then discovered that the faucet had a crack in the screw ridges. The bottom metal rim of the canister was scratched and missing paint as well. Damage during shipping. Left message with Chuck Hilgers secretary.
January 3, 1987
First experiment after fixing faucet and securing that there was no air leakage. trying small flat mold with latex and plaster - 2 couched sheets over a flat rock and coral. Pressure to -22.5 Hg.
1) Couched sheet over flat rock. Could be pulled immediately off of rock. Detail on inside but exterior area still interesting even w/o detail.
2) Couched sheet over coral. Came off. Turned it inside out and stuffed with tissue to dry. Very light and thin sheet. Airy structure.
3) Flat Mold. Picked up every nuance on the latex mold. The surface was dryer with 5 minutes of vacuuming than with 45 minutes of hand sponging. This will save a lot of time! Even though flat, the plaster mother mold did soak up moisture and crack. What will we do with the large molds w/ extremities to keep the plaster from cracking?
January 8, 1987
1) Latex Rubber Mold w/o plaster mother mold. Filled tightly with pulp. Results not at all true to the shape of the rock...it looked like a flat pancake!
2) Another flat mold. (Plaster) Final paper piece very true to detail. Plaster still cracked though.
January 12, 1987
1) Latex Rubber Mold w/ plaster Mother Mold undercuts built up with oil based plasticene clay. Best results yet! Got a full 3D effect. Unfortunately because of a bit of undercutting still around plaster mold and because we left motor on longer than necessary, a hole burst into foam and plastic.
2) Couched flat sheets over an uninked woodcut block. Excellent results w/ great potential. I would have to cut relief with vacuuming in mind.
3) Couched sheet onto formica instead of felt. Hilger suggested a 2nd sheet of felt, but we found that the vacuumed work was difficult to transport without damage to the piece. The vacuum had enough pressure to draw the water from the pulp on the formica thru the lower felt and screening layers. Good news because it enables larger, more intricate sculptures to be lifted from the vacuum system to dry, and frees up the equipment for the next work.
January 16, 1987
1) Laid object on top of a couched sheet. Instead of pulp over object. Pressure sucked pulp up to create interesting edges. Crisp lines.
2) Sheets over free form plaster shapes. Once again the plaster cracked in hairline fissures, but that didnt show up on finished paper piece. Even after the 2nd attempt with another sheet placed over cracked form, it was impossible to detect on vacuumed piece.
January 22, 1987
1) Start working on large artwork of Barbaras...
Large rock compilation on formica built up with plasticene clay. couched thick sheets onto a separate formica sheet and let thoroughly drain. Pushed extra pulp to fill in any undercuttings. then flipped formica with sheet on it upside down over rocks and let it fall onto them. (Rocks were sprayed with silicone spray to act as a mold release.) More pulp was pushed into any potential problem areas. Great success! Indeed, this started Barbaras series of works. Let piece thoroughly dry before removing sheet off of rocks.
PROBLEMS WE ARE COMING UP AGAINST AT THIS POINT
These could be affecting the final product:
1) Wetness of the couched sheet is affecting the final dried state. If the sheet is too drained and dry, the layered way of placing sheets into mold creates thin sheets couched directly off of mold onto object to be cast. This will allow for the pulp fibers to bond together.
2) Way of Beating Fiber. In Barbaras studio we use a heavy duty food blender. Pulp is not beaten to a consistent texture. fibers cut short and lumpy. Next time, I will beat the same 50% abaca/50% cotton linter fiber mixture in a Valley Hollander beater (at the U of AZ art department) to see if there is any difference. This would assure a smoother surface and fine detail. Frank Gallos vacuum cast work is made by using very fine pulp sprayed into the mold by a high pressure compressor...
EXPERIMENTS CONTINUED
January 23, 1987
1) Rolled oil base ink on woodblock. Well drained sheet placed over inked block. Vacuumed. Results terrible. Oil wouldnt adhere to wet pulp. Actually stuck to block...
2) Watercolor washes on woodblock. Color was so absorbed by wet pulp that color was very subtle and faint. Potential here.
3) Rolled water base ink on woodblock. Results not bad, since ink was a stiffer substance than watercolor.
Unfortunately at this point, I stopped making journal notations so the following entries are not dated. I continued to work in Barbaras studio once or twice a week through mid March, working with her personal artwork or on my own images. We, by this point, had worked out a lot of the kinks technically and each began to pursue our own direction...
Barbaras artwork: The rock formations became bigger and more complicated. As long as the undercuts from the rocks were filled with plasticene, the dried paper separated easily from them. Barbara was fascinated by the interior concave forms left by the rocks and would use spray paint, acrylic paint and dry pigments to paint the surface. She played with the illusion of the the convex shapes appearing concave depending upon the angle viewed. By the time several were completed, she became dissatisfied with the way the colors sat on the surface. In early March, we tried some experimenting with colored pulps. The results are much more beautiful and gratifying, as the inherent pure surface quality of the paper and fibers are allowed to show.
 |
|
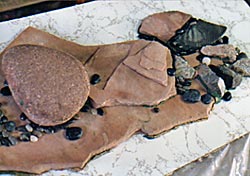
An example of Barbara Kennedys rock pile formation. Note plasticene
clay to build up undercuts. (Clay has already been removed from large rock on right.) |
Image (Inner surface) created from rock pile above. Surface painting
with spray and acrylic paint is in progress. Work by Barbara Kennedy. |
 Different work, but completed. ©Barbara Kennedy. |
|
Reverse side (outer surface of above artwork.) Lightly spray painted. |
We, as yet, have not figured out how to use her latex/plaster molds that we made before she decided to buy the vacuum casting system. They are not flat bottomed and are very intricate...New molds would have to be made specially for the system. Also the problem still exists as to how to create more 3D objects. The flattening aspect of the vacuum would seem to not allow for it...But better success was had by sealing the plaster molds with marine resin. Still hairline fissures, but useable.
 |
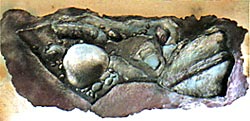
work by C. Nash |
My own work: I continued with my experiments using woodblock. I cut a long image specifically in mind to cast it... The result was satisfactory, but not exciting. I cast it uninked and let the sheet dry unremoved on the woodcut, weighted to dry to stop any shrinkage. It still shrunk and when I tried to print the image back onto the cast sheet, it was off register.
Dont feel any results here couldnt be gotten using more standard methods with a press. Perhaps a deeper carving with no intention of printing still holds much potential for an image. Indeed a thick block carved for a relief image could yield interesting textures and well sealed would provide an image that could be repeatedly cast for an edition. No worry of plaster cracking here!
My most satisfying images and the ones that excite me to continue pursuit, use plasticene forms on formica. The results in paper are as if the figurative form is pushing through the sheet. The photos illustrating the METHOD section are the process used to create the image below. I had only just begun this series before I left for Japan...I have full intention of continuing when I return!
C. Nash
Kyoto
May 4, 1987
1 August 3, 2008, note: Barbara Kennedy and I became great friends and colleagues. In November of 1998, she passed away at age 87. Barbara was a shining, smiling, creative spirit whose inquisitive mind, imaginative work and ageless spirit still continues to inspire me today.
|